Showing posts with label Starfish and Sandcastles. Show all posts

Friday, 26 February 2021

Rocker card

Today's card is one I've repurposed - I'd made it back in 2016 when I was on the Polkadoodles DT but I'd never got around to using it (you can see the original card here).
 

I replaced the stamp topper with a pre-coloured image from an old LOTV art pad (you can still get digital versions of their art pad images from their Etsy shop)

Thursday, 3 August 2017

Swimming By

Hello lovely peeps


Just popping by to show you the card I've made with one of the July images for the Bloobel Progressive Challenge - this one is Swimming Diver.

I pulled her into Craft Artist and added a background paper from the Starfish and Sandcastles Collection by Polkadoodles.


To make it look like she was swimming among the fishes I added one of the separate fish embellishments and placed it in front of her.


I added a sentiment using the alphabet from the Daisytrail Flora and Fauna digikit then rotated everything so that I could fold and cut my A4 sheet down to make the card base.


After printing off onto Super Smooth card I coloured the diver in with Promarkers
Hair: Cocoa, Cinnamon
Skin: Coral, Sunkissed Pink, Blush
Wetsuit: Black, Cool Grey 4 & 5
Flippers and Goggles: Marvi Y615, Tulip yellow, Buttercup
Bubbles: Tan, Duck Egg, white gel pen


I would like to enter this in the following challenges:-
Bloobel Progressive Challenge Underwater
Incy Wincy Designs - One paper layer only
Animal Friends Challenge  #53 sports/hobbies
Squirrels Not So Random Challenge #6 Holiday Fun
Creative Moments #123 Anything Goes, option of Summer fun
Craft Rocket Challenges #40 Animal Kingdom
Crafty Hazelnut's Patterned Paper  Anything goes with Patterned Paper
The Crafty Addicts #39 Anything Goes

Thanks for stopping by,
Katrina x

Tuesday, 1 August 2017

More Cocktails on Throwback Tuesday

Hello lovely peeps


Oh how I wish this was me right now :o)

This week's unblogged make is a card that I made last summer with the VIPXXL Winnie Starfish and Sandcastles collection from Polkadoodles.

'Float Away 'Winnie was printed onto super smooth card and coloured in with Graph'It markers, then all of the embellishments were fussy cut from Design Sheets on the CD. The flowers were white so I coloured them to match the main image/background paper, and I doodled lines around the waves and main image with a black fineliner pen.

Thanks for stopping by,
Katrina x

Tuesday, 11 July 2017

Building Sandcastles on Throwback Tuesday

Hello lovely peeps


It's Throwback Tuesday again and this week features another card made using the Starfish and Sandcastles VIP XXL Collection from Polkadoodles.

I pulled the black and white version of Winnie into CraftArtist and added a couple of the background papers behind her, 'cutting' the sand paper with the scissor tool to make the horizon look more realistic.

After printing off the topper onto super smooth white card I coloured Winnie in with Graph'It markers and then added a paper pieced umbrella. The lettering and sentiment are all in the collection, I added doodled borders around these and the main topper using a black fineliner pen.

Everything is layered up on a 7x7" card which I've covered with another of the backing papers, and some stapled ribbons from my stash add a little finishing touch.

I would like to enter this in the following challenges:-
The Ribbon Girls July any card
Catch The Bug   Theme-Outdoor Fun
Cards und More  #188 girls just wanna have fun
Card Mania #94 Summer fun
Let's Craft & Create Challenge #127 Just beachy/red, white blue
Crafty Cardmakers #192 tic tac toe (ribbon, digi, 2 or more papers)

Thanks for stopping by,
Katrina x

Tuesday, 4 July 2017

Introducing Throwback Tuesday with Whale of a time

Hello lovely peeps


I've got another unblogged card for you today, which was only posted in a group on Facebook last year. As I still have several old cards to show you I thought I'd make a regular thing of it and have

Throwback Tuesdays


 When I've eventually blogged all of my old cards I plan on using Throwback Tuesday to show you new cards that I make with old stamps. I've got dozens of old stamps in my stash, the majority of which are unused, so it will give me a good excuse to get them out and have a play.

So my first official 'Throwback Tuesday' card is a simple one. The papers, image and sentiment are all from the Starfish and Sandcastles VIP XXL Collection at Polkadoodles.

I printed the whale onto two different papers and cut one of them out to paper piece on top of the other. I coloured in the bottom of the whale with a dark grey Promarker.


The sentiment was cut with a circle die and layered on a slightly larger circle which I coloured with a red Promarker. For a bit of texture I added Fluffy Stuff where the water splashes are and heated it (it will still puff up if you leave it overnight to dry but I'm impatient, lol)


I would like to enter this in the following challenges:- 
Pink and Main Challenge #23 Red, white and blue
Angie's Digital Stamps #11 Anything Goes + twist: Red, White and/or Blue
Dragonfly Journeys #95 Red, White, Blue

Thanks for stopping by,
Katrina x

Friday, 16 September 2016

Seaside canvas for Polkadoodles

Hello lovely peeps and welcome to my new follower.


It's challenge reminder time at Polkadoodles today where the theme as always is 'Anything Goes' and the Design Team theme is 'Oh I do like to be beside the seaside' (hands up if you're singing along now).

I didn't have anything prepared in advance for this challenge because
a)  I ran out of time before my elbow op, and
b) I was expecting my arm to be back to normal by now

Unfortunately my current crafting abilities consist of painting (a little bit at a time), drawing wobbly lines, dodgy stamping and a tiny bit of cutting. Since the only PD products I had to fit the seaside theme were digi stamps, I was a bit stumped at first on how I was going to produce something. Luckily I hit on the idea of printing the digi stamp images onto tissue paper which I could transfer onto canvas board.

First I painted the sky and sea onto a 5"x5" canvas with acrylic paints


Next I opened CraftArtist and dragged in the beach hut digi from the Summertime collection and the fence/ shoreline digi from Winnie Starfish and Sandcastles - I then resized and arranged them to fit into a 5"x5" square outline.

For printing I taped some tissue paper onto a piece of card - you need to tape down all four sides.


I slapped a load of mod podge on the canvas and put the tissue paper over the top (printed side down).


After glueing down the edges of the tissue paper with more mod podge I started colouring in the image with acrylic paints and a small paintbrush.


I covered over the windows with several layers of white because they were too fiddly for me to paint.


 For the finishing touch I typed the first line of the song into CraftArtist using Tempus Sans ITC font and printed it onto white card . I cut up the words and drew around them with a black fineliner pen before attaching them with pinflair glue gel.


I would like to enter this in the following challenges:-
Creatalicious Challenges #99 - Anything Goes with optional pick a song (Oh I do like to be beside the seaside)
Let's Color Saturday Linky Party #12 Anything goes with something colored
Addicted to Stamps and More #211 Anything Goes
 Fab 'n' Funky #318 Go outside
Crafting By Designs September Anything Goes 
Country View Crafts' Challenge Travel
Inspiration Destination  #103 Always Anything Goes
 Crafty Creations #324 For the Home (this is going in our hallway)

Please pop on over to Polkadoodles to see the makes from my fabulous teamies. There are also two Polkadoodles shows on Create and Craft today at 2pm and 7pm (BST), where Nikky will be showing you some gorgeous new stamps.

You can watch Create and Craft on
Sky 674
Freeview 23
Virgin 748
Freesat 813

Thanks for stopping by today,
Katrina x


Friday, 29 July 2016

Good Vibrations for Polkadoodles

Hello lovely peeps


It's time for a new challenge at Polkadoodles, and the rules have changed a bit. Instead of having a compulsory theme, from now on the challenges will be 'Anything Goes' but there will be an extra optional theme for those of you who like something specific to aim for.

So the theme for this next fortnight is 'Anything Goes' with an option of 'Anything but Square'.

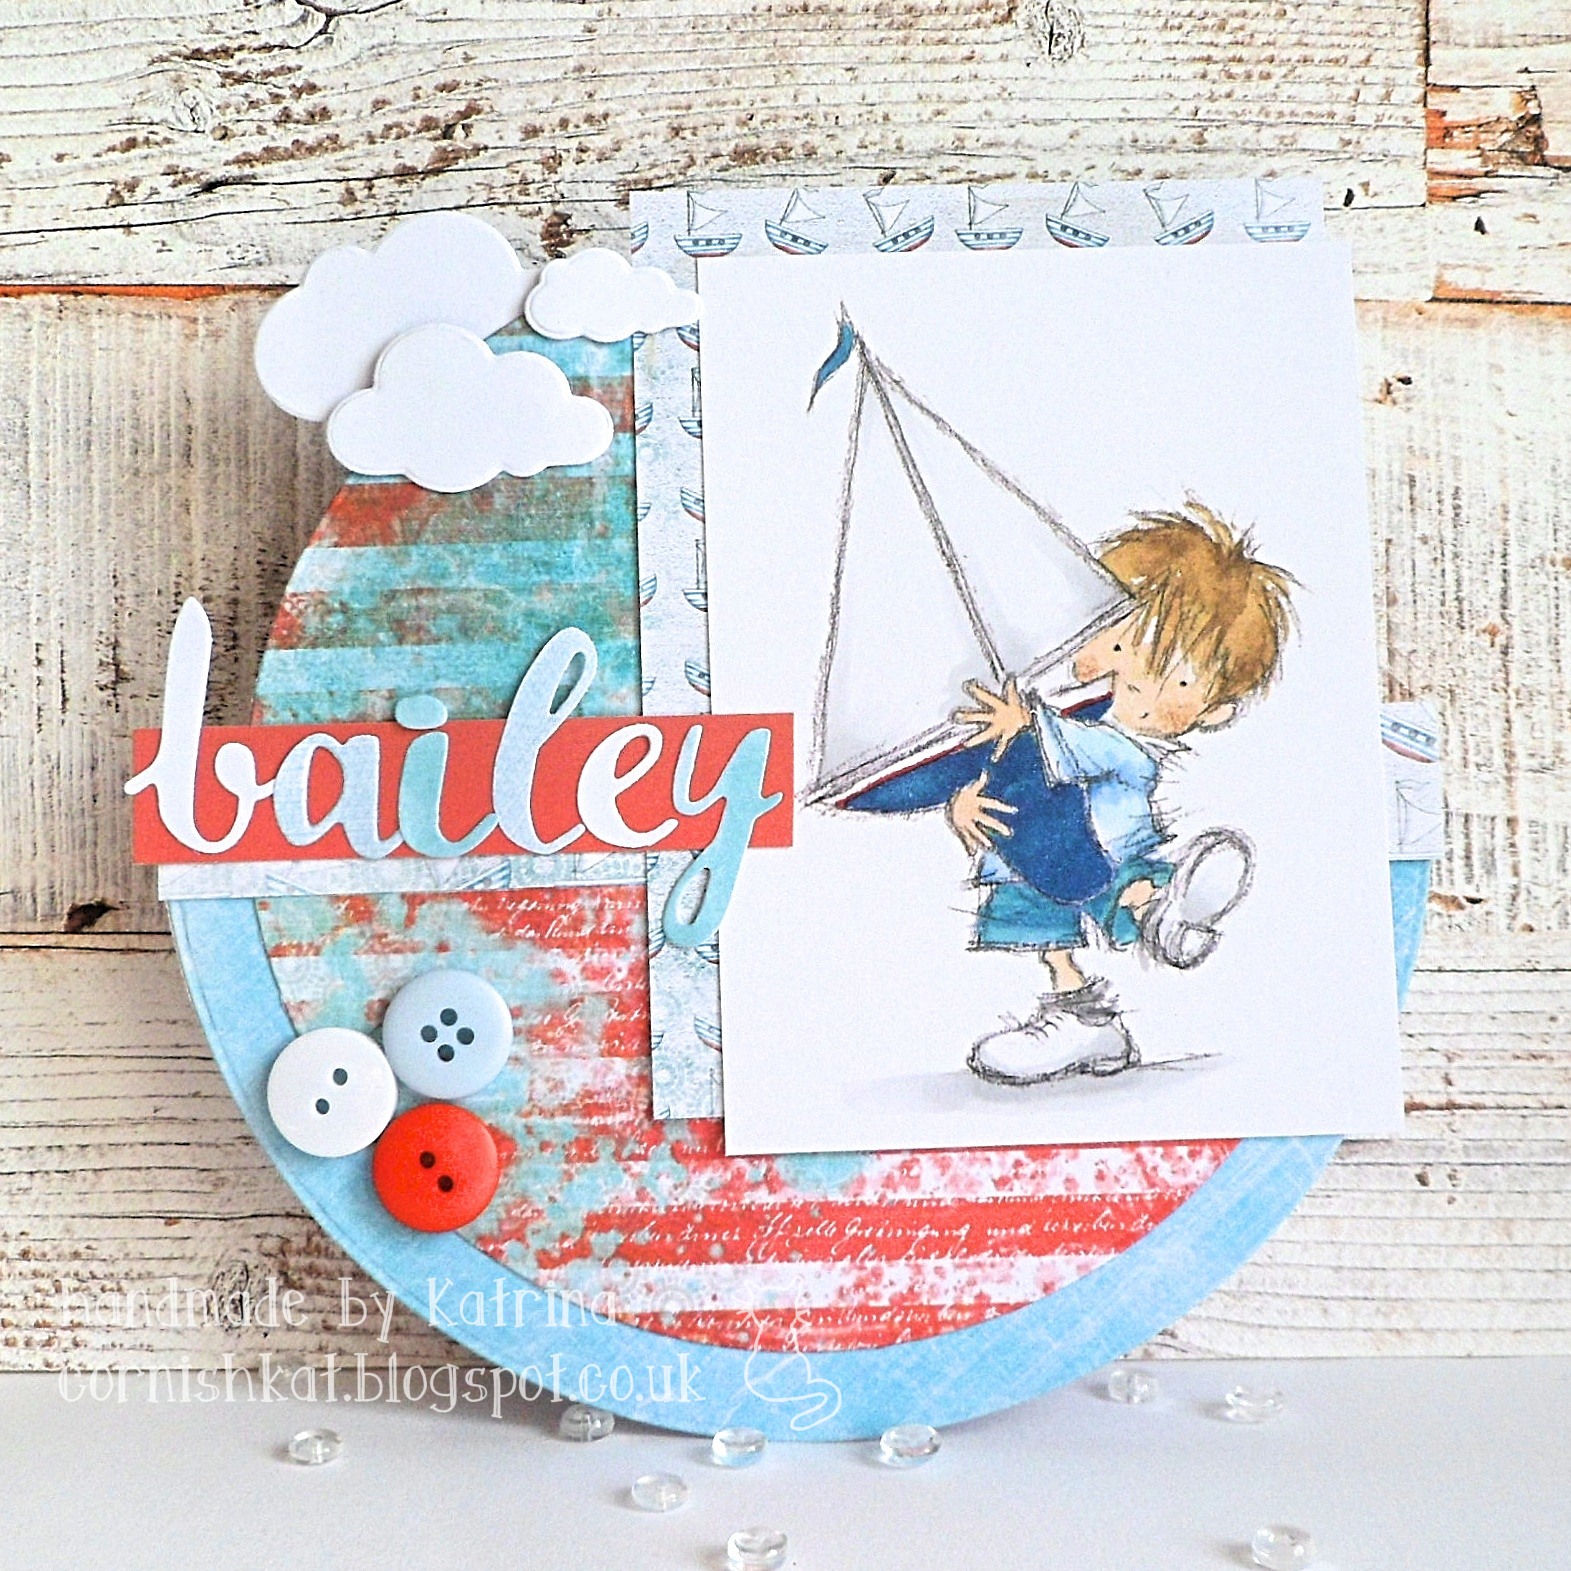
I've used part of a sentiment, some papers and a digistamp from the fabulous Starfish and Sandcastles VIP XXL Collection to make a rocker card. Rocco is coloured with Promarkers and I've added buttons and some cloud die-cuts to finish.


I would like to enter this in the following challenges:-
Open-Minded Challenges #7 Patriotic/Use your Country's colours (UK-red, white and blue)
 Come and Get It  #128 Kids cards
C.R.A.F.T. #374 Summer  
Brown Sugar #209 Anything Goes
Colour Crazy Challenge Anything Goes
Cut it Up #101 Red, white and blue (clouds and circles are die-cut)
Imagine That's Creative Playground #6 Fancy Folds/Shaped Cards 
Creative Inspirations #255 Seaside/Sunshine/Summer Holidays 
A Snowflakes Promise  #27 Summer

Thanks for stopping by,
Katrina x


Friday, 22 July 2016

Treat Yourself for Polkadoodles

Hello lovely peeps


It's challenge reminder time at Polkadoodles, and the current theme is Summertime.

I've used part of a sentiment, some papers and a digistamp from the fabulous Starfish and Sandcastles VIP XXL Collection. Winnie is coloured with Promarkers and I've added sequins and some mesh ribbon to finish.


I would like to enter this in the following challenges:-
Glitter n Sparkle #197 Anything Goes
Simon Says Stamp (Mon)  Nautical/By the Sea
Colour Your World with Lacy Sunshine Anything Goes
The Crazy Challenge #227 Summer Fun  
Art Impressions Stamp Challenge   #189 Sweet Summertime 

Thanks for stopping by,
Katrina x


Saturday, 9 July 2016

Waterfall card for Polkadoodles

Hello lovely peeps


I've got a last card to show you from last weekend's Starfish and Sandcastles launch on the Polkadoodles Facebook page, along with a little tutorial on making a waterfall card.

First I made my toppers - the top one was a digi stamp from the collection which I coloured with Promarkers and Graph-Its. The next three were snippets of digi papers with part of the sentiment dragged on in Craft Artist & coloured to match (I also added digital emellishments to the last topper).

So, to make the Waterfall mechanism start by cutting a strip from the long side of a piece of sturdy A4 card, the same width as the toppers you want to use. I have four toppers which are 6.5cm square, so my piece of card is 6.5cm x 29.5 cm
 
The next step is to score and fold it - the first fold should be the same height as your last topper, and then add folds at 2 cm intervals, one for each additional topper. I have scored at 6.5cm, 8.5cm, 10.5cm and 12.5cm


 Add some double sided tape to each of the panels so that you can attach your toppers
(the picture below shows the piece I have used on my finished card - I printed onto one side of my A4 card before I cut off my strip and I have glued a matching piece of card onto the long panel)


Your last topper needs to go on the large (in my case, square) panel first, then attach the 3rd, 2nd and 1st (so your 1st topper sits on the fold which is next to the long back panel)


 Now turn the strip over so that the bottom topper is face down and nearest you. Glue on a piece of some more sturdy card which is wider than your strip and 2-3 cm high. This is the part that will be attached to the front of your card, I have decorated the front of mine.


Pierce some holes through each side for brads


Before I attach it to the front of our card, I'm just going to add an eyelet to the other end of the strip - this is the part that will be pulled.

Punch a 3/8" hole through
I have used a Fiskars Eyelet Setter which has a punch at one end and a setter at the other


Then put your eyelet through the hole, turn it over and set the eyelet in place (which basically means bashing it until the metal splits and grabs onto the back of the card)


I would recommend testing the mechanism at this point- place it flat on your desk with the longest part folded behind the toppers. Place a finger firmly over each of the holes we made in the wide strip and then tug on the bottom of the long strip that has the eyelet set in it. As you pull down the first topper should tuck in behind to reveal your second topper, then the second will tuck behind to reveal your third topper, etc.

Assuming that all works OK we can attach the mechanism to the front of our card. The only parts you actually want to attach are the sections of the wide strip that stick out from the sides (i.e. the parts we put the holes in). Place the mechanism where you want it on the front of the card and mark through the holes with a pencil.


Pierce holes through the front of your card where the pencil marks are and then place the mechanism back over the top, thread some brads/split pins through both layers and then spread the legs out on the inside of the card. This will hold it securely in place on the card while the recipient (or if they're an adult, their children) merrily push and pull the strip up and down several dozen times to reveal the hidden panels .


All that is left is to finish decorating the card.I have tied some tiny white 'rope' through the eyelet at the bottom to tie in with the nautical theme and covered up the wide strip and brads with lots of shells and crabs.

I'd cut a strip off the right-hand side of the card front, which reveals the inside of the card, so I have used a matching paper to cover this. I cut out some flags from one of the Design Sheets and glued them to the right hand side of the card front.


here's a little video showing each panel revealed as the rope is pulled down ...


  I would like to enter this in the following challenges:-
Allsorts #371 One for the Boys
Through The Craft Room Door - Always Anything Goes
QKR Stampede #199 Transportation
Julia Spiri Challenge #21 Anything Goes with a twist of *At the Beach or Sea*
Kitty Bee Designs #75 Summer Fun
Penny's Paper-Crafty Challenge Blog #285 Anything Goes
Pile It On  #111 Moves Me (Vehicles) 
World Wide Open Design Team Challenge 11 Anything Goes
Tinker- Dream  #42 Journey/Vacation
Simon Says Stamp (Wed) Photo Inspiration


Thanks for stopping by,
Katrina x

Sunday, 3 July 2016

Fintastic day

Hello lovely peeps.

We've had a bit of sunshine here today, which is a very welcome change from the grey skies we seem to have had for weeks.


I've got another card to share with you featuring the fabulous new 'Starfish and Sandcastles' collection from Polkadoodles. This one is a penny slider card and features Rocco, Winnie's new boyfriend.

I printed the digi stamp and boat in a size that fit my circle dies and coloured them in with Promarkers
Skin: Blush, Oatmeal, Coral 
Hair: Satin, Tan, Caramel
Water: Tea Green, Duck Egg
Shark Fin: Ice Grey 1-4
Boat hull & flag:  Meadow Green, Apple and Graph'It 5255

Next I printed one of the yummy background papers onto card and then printed the sentiment over the top (I did a quick test with copy paper first to make sure the sentiment went in the right place).

The card was cut down to 7"x7" to fit the front of my card and then I die cut a circle in the middle (a bit larger than the circle with Rocco on). I drew a cross in the middle with pencil to help me line it up properly.


Next I put foam tape on the reverse - make sure you leave enough room for the penny to move past easily. Also, you need to check that the foam tape is deep enough to allow for the depth of the penny, mine needed two lots of tape. Repeat for the centre circle.


I've rescued two pennies from an old card, so they're already stuck together with a round foam pad.


but if you're doing one from scratch it's easier to stick them together after you've glued the frame in place.

After checking that the bottom penny fit underneath OK I attached the centre circle onto the front of the card with some more of the background paper to cover up the white.


Because the pennies were already joined together I struggled a little bit to get the outside frame in place and sandwiched between the two coins. It's obviously easier to glue the top penny on after you've put the outer frame in place. In hindsight maybe I should have prised them apart and used a new foam circle to join them back together :D


To finish off I added a few cloud die cuts and glued the boat on top of the penny.

It slides around perfectly. Yay!


Here's the finished card


I would like to enter this in the following challenges:-
Passion For Promarkers Challenge  #352–In or beside the sea
Mod Squad Challenge - Nautical
Lil Patch of Crafty Friends  #37 Anything Goes
Deep Ocean Challenge #132 Colours of Summer
Double D Challenges All about the boys
I love Promarkers #312 Sport (swimming)
Country View Crafts' Challenge Have Fun with Circles 
Doodle Pantry  #19 Anything Goes 
SSS Work it wednesday use some wafer thin dies OR stencils in your project!
As You Like It Challenge Markers Inks or Pencils (& why) - Markers - They're a great tool for adding colour quickly and you can get very professional results when you start blending

Thanks for stopping by,
Katrina x

Fab new Polkadoodles collection

Hello peeps, hope you are well.
I would like to wish a very warm welcome to my new email follower, I'm thrilled to have you here.


There has been a launch party going on over the weekend at the Polkadoodles Facebook page for a fabulous new collection called 'Starfish and Sandcastles'.

We lucky girlies on the DT have had the VIP XXL collection to play with (also available as a CD).

The collection is choc full of gorgeous seaside images, papers and sentiments - you're spoilt for choice. As soon as I spotted the "You're fab!" sentiment though my first card was decided. I loved these lollies as a child and you know I like my puns.

I coloured Winnie in with a mix of Promarkers and Graph'Its and layered her up on one of the 'Not So Plain Janes' papers. I printed the top of the lolly digi onto white card and also two patterned papers, then paper pieced it before adding some brown beads for sprinkles (attached with Anita's Tacky glue)


There are a few fabulous weathered board papers in the collection but none in the colour combo I wanted, so I dragged the red, white & blue version into Craft Artist. First I chopped off the blue boards on one copy, then left just the blue boards on another which I then 'coloured' brown before merging them back together. I adjusted the transparency to fade it a little so it didn't overpower the foreground images.

And here's my finished card, complete with a real (washed!) lolly stick.


I would like to enter the following challenges:
Crafty Boots - Summer Time
Melonheadz Friends Challenge Off to the Beach
Star Stampz Challenge Here comes summer
Open-Minded Challenges #6 Seasons/Holidays
A Snowflakes Promise #25 Summer
Creative Moments #95 Anything Goes w/optional twist Summer 

613 Avenue Create  #183 Anything Goes w/Optional Twist: American Beauty - Add a Rose
Inkspirational #112 Anything goes with Red 
Eclectic Ellapu - Anything Goes or "life's a beach"
 Color Throwdown Color Challenge ctd399

 
Just Us Girls #350 Word - Summer


Thank you so much for stopping by,
Katrina x