Showing posts with label dies. Show all posts
Sunday, 2 June 2024
Tuesday, 29 November 2022
CAS Birds
Hello lovely peeps, I hope you are well.
A quick card to share with you today, using the Collectables Birds dies by Marianne Designs.
Saturday, 19 June 2021
Wednesday, 14 April 2021
New Home
Hello lovely peeps, I hope you are well. Apologies for the lack of posts and visiting your own blogs to comment. Between work, gardening and my new crafty addiction (more to come on that soon), I've not had much time left for blogland.
Today I'm sharing a card I made for my friend to give her son and partner when they moved into their new home.
She sent me pictures of the house beforehand and it's so lovely I wanted to move there myself :D
I decided to do a variation on an easel card I designed a few years ago but designed it specifically to look like their new house.

There is a beautiful stream running past too so I have incorporated that onto the base of the easel.

There is a beautiful stream running past too so I have incorporated that onto the base of the easel.
Tim Holtz (Sizzix) mini tattered florals and garden greens dies
Cheery Lynn fence die
various scraps of paper
LOTV circle sentiment stamp
wadding for the chimney smoke
watercolour card and grey paint for the windows/door
Aud Sentiments Challenge #272 AG & a sentiment
Crafty Hazelnut's Patterned Paper AG with Patterned Paper
Thanks for stopping by, stay safe
Katrina x
Thursday, 4 March 2021
Country Rose
Another CAS card today but this time just using dies/punches.
I bought this lovely 'Country Rose' panel die (Sizzix thinlits) a couple of years ago but as usual it's been sat unused since then. I came to the conclusion a while ago that my main hobby is actually shopping for craft supplies rather than crafting :D
Saturday, 6 February 2021
Birthday Wishes
Happy weekend everyone.
No stamps required for today's make (I know, no-one is more surprised than me).
I was a bit short of inspiration in the week so I had a look on pinterest, and found this gorgeous card by 'Aromas and Art'
Monday, 1 February 2021
Tidy Up
Hello lovely peeps and welcome to my new follower Diane.
I'm feeling very chuffed with myself today, I spent most of yesterday tidying and organising all the piles of paper/card I had lying about. Not only are my papers all tidy and colour co-ordinated but I can now see most of my craft room carpet again :D
Tuesday, 26 January 2021
Friday, 8 January 2021
Happy New Year
Hello lovely peeps, I hope you are all well.
My New Years' Eve was very much like this card, lol. My sister-in-law and I each made cocktails and toasted each other via video call once an hour, though I have to admit I was very tipsy after the third one and went to bed before midnight :D
So, I wish you all a happy and healthy 2021. Let's hope that things will start getting back to normal soon now that vaccinations are getting rolled out.
[The cocktails on my card were made with Tim Holtz 'Happy Hour' dies and watercolour paper, coloured in with Distress markers and a damp paintbrush].
I would like to enter this in the following challenges:-
Simon Says Stamp (Mon) use a new/unused product (first time I've used the dies)
Crafty Catz #533 food/drink
Pammies Inky Pinkies 2101 Anything Goes
Thanks for stopping by, stay safe
Katrina x
Sunday, 15 November 2020
Leafy Spelling
Hello lovely peeps, I hope you are well.
Just popping in to show you the card I made for my Mum's birthday.
I covered an A5 landscape card blank with a paper from the Rose Garden paper pack (First Edition) and then cut lots of foliage from Falling Leaves papers (again, First Edition).
After a bit of judicious snipping I arranged the various sprigs to spell Mum and attached them to a strip of vellum with dabs of Cosmic Shimmer glue. This was then attached to the card by only adding glue where it was hidden by the lettering.
For finishing touches I added some knotted organza ribbon, a computer sentiment and tiny flowers made with Tim Holtz tattered florals thinlits and little gems.
I would like to enter this in the following challenges:-
Penny's Paper-Crafty Challenge Blog #485 Anything Goes using paper
Rabisco Challenge Anything Goes with haberdashery item
Crafty Calendar Anything Goes
Cut it Up #213 For a woman/girl with a die-cut
Through the Purple Haze #173 tic tac toe (top row)

Thanks for stopping by, stay safe
Katrina x
Katrina x
Friday, 6 November 2020
Watercolour die cuts
Hello lovely peeps, I hope you are well.
My craft room has been in a right mess for the last year and I keep trying to tidy it up - but then get distracted by finding something I'd forgotten I had, lol. This time it was some spellbinder flower dies that I'd never used, so I thought I'd have a little play.
After cutting one out of watercolour card I painted it with distress ink dabbed onto my craft mat.
I used the swirly end of the thank you die as 'ribbon' to give the impression of tying the stems together.
I would like to enter this in the following challenges:-
Thanks for stopping by, stay safe
Katrina x
Labels:
CAS,
dies,
flowers,
spellbinders,
Thank you,
watercolour
Wednesday, 28 October 2020
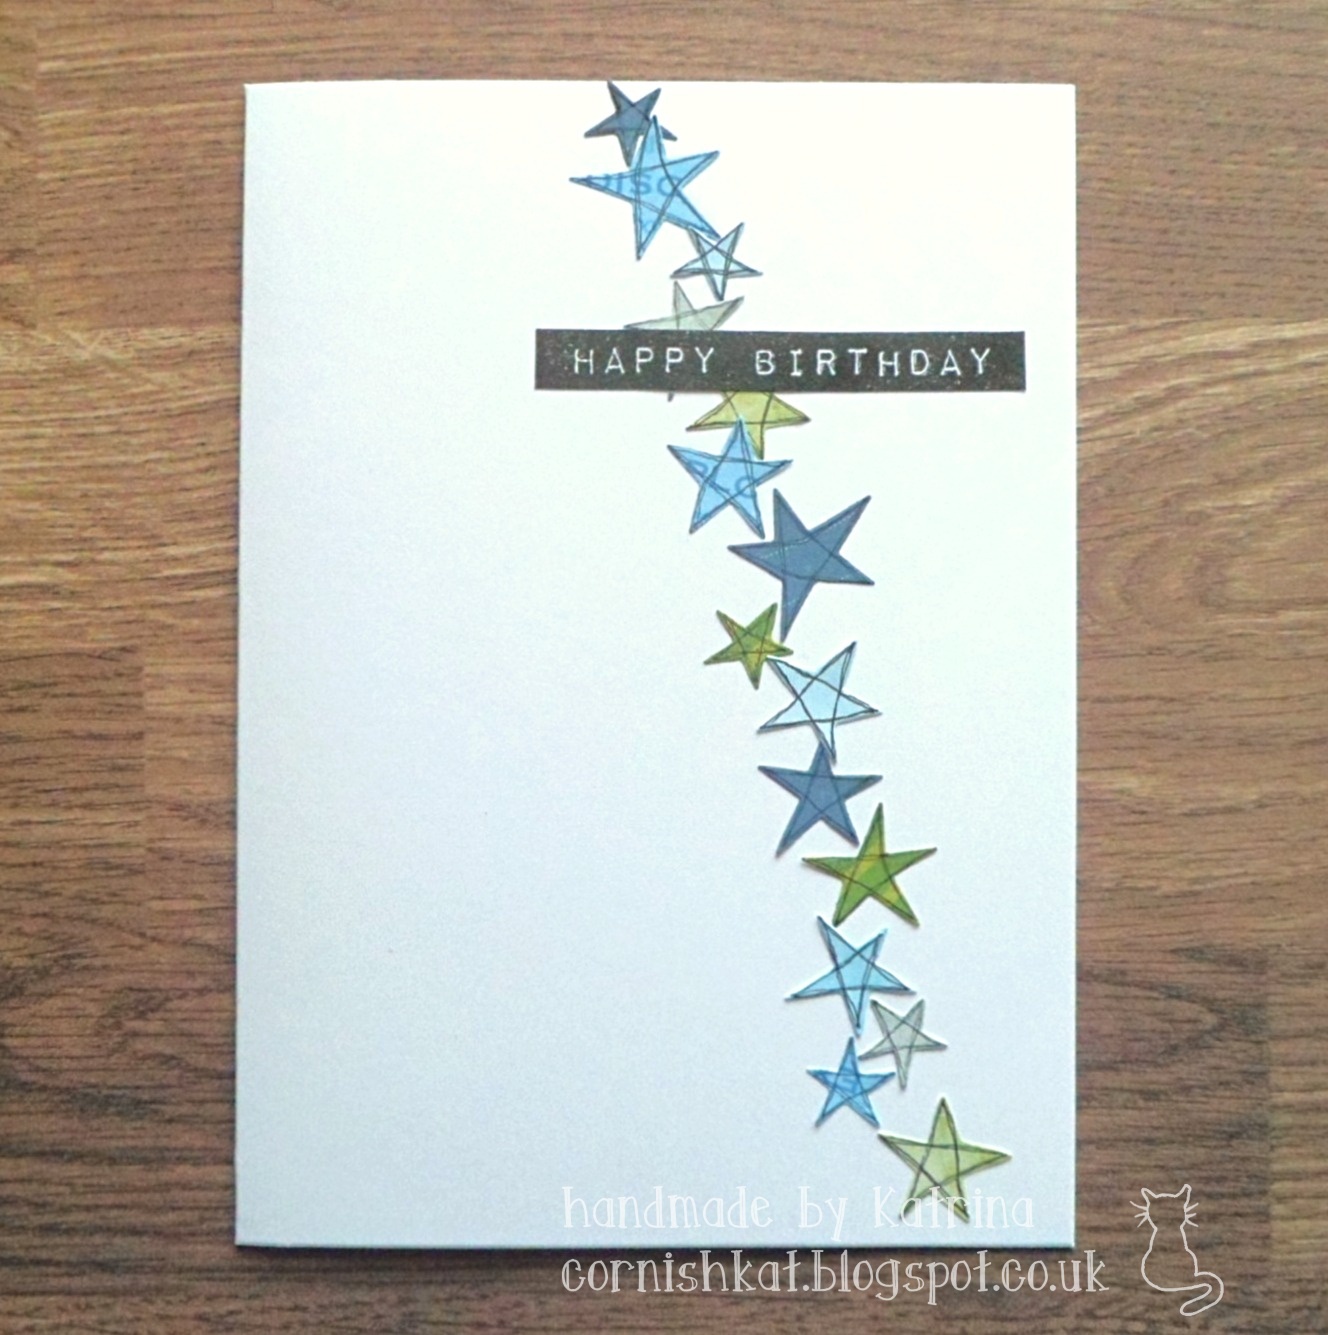
Stars
Hello lovely peeps, I hope you are well.
Another card to use some of my paper scraps, using 'Swirling Stars' dies by Tim Holtz. I doodled outlines around each star after die-cutting.
The greeting was stamped with one of the greetings from the 'Label Love' set by Altenew
I would like to enter this in the following challenges:-
As You Like It Challenge Favourite colour combo blue and: green, they make a perfect combo, the colours of the sea (and great for masculine cards)

STAMPlorations CAS Challenge anything CAS goes (opt gray & orange )

Make My Monday - #134 masculine
Thanks for stopping by, stay safe
Katrina x
Katrina x
Monday, 21 September 2020
Autumn colours
Hello lovely peeps, I hope you are all well.
I love this time of year - leaves falling, beautiful colours, and hopefully still a bit of sunshine - so I didn't have to look far for the inspiration for my card today.
I'm taking a break from stamping at the moment so dragged some of my dies out instead. The leaves are by Craftascope and the sentiment is from a Crafters Companion advent calendar. To get the coloured card I smooshed distress inks onto my craft mat and dragged white card through before drying.
I would like to enter this in the following challenges:-
Simon Says Stamp (Wed) No stamps allowed
Allsorts #590 my lovely garden
Mod Squad Challenge - autumn foliage
Crafter's Cafe #251 seasons
Tinker- Dream #btchallenge93 Fall/Autumn
Crafty Friends Challenge #145 autumn colours
Katrina x
Monday, 15 October 2018
Snowflake cutout
Hello lovely peeps and welcome to my new follower :o)
Back to clean and simple today with another card using the Large Christmas Greetings stamps from Lili of the Valley.
Thursday, 15 February 2018
Family Tree Frame
Tuesday, 26 September 2017
Sunday, 20 August 2017
May the Forest be with you
Hello lovely peeps, and welcome to my new email follower :o)
Just popping in to show you the birthday card I made for hubby. He is a Star Wars fan so the sentiment that came with the Forest Friends stamp set from MFT is perfect :o)
I stamped several of the characters onto Neenah Super Smooth 120gsm and cut them out with a small border. I coloured them in with Promarkers and a white gel pen for the deer's spots.
Oatmeal, Burnt Orange, Fire Brick
Ice Grey 1,2 and Blender
3210, 3255, 3290, 9400, 9403, 9404 (Graph'Its)
Each animal was glued onto a stitched circle, die cut from First Edition papers. The fox and owl have little light sabres made from matching paper. The HB stamp is from an old Kanban set.
I would like to enter this in the following challenges:-
Allsorts #429 Forest Friends
Simon Says Stamp (Wed) Add a sentiment
I love Promarkers #340 One for the boys
CAS On Friday #114 Birthday
Penny Black and More All Creatures Great and Small
Craft Rocket Challenges #40 Animal Kingdom
One Crazy Stamper My favourite things (these are my new favourite stamps)
Incy Wincy Designs - Go wild
Thanks for stopping by,
Katrina x
Sunday, 23 April 2017
Lily Concertina for Leonie and Blog Candy Alert
Hello lovely peeps, I hope you are enjoying your weekend.
I'm back with the final sample that I made for Leonie's Typography show, this time combining the Pebeo metal leaf AND Sara's Shabby Chic dies
First I'll show you how I did the colourful background. I started by painting some Sheena Stamping Card with white Tinting Base
then I used a wet wipe to apply 3 different colours of acrylic paint
before cutting the card into four equal panels.
I used Leonie's Typography dies to make stencils from white card
and stippled white titanium paint through the apertures with a stencil brush.
with a different letter on each of the panels
I used the yellow, orange and green paints to stencil more letters through and then stamped around the edges with Leonie's Funky Tree stamp
I applied lots of Pebeo Gilding Paste from the bottle around the edges of each panel using a paintbrush, then left it to dry for an hour.
before applying Gold Metal Leaf (shiny side up)
For the front of my card I used two of the Typography mini embossing folders to emboss another painted panel of card. Remember to leave the edge of the folder poking out over the edge of your platform so you don't get a line across the card.
I used a sanding block over the raised areas to reveal the white card underneath
For the final decoration I made some lilies from white paper using Sara's Shabby Chic Classic Lily dies, coloured with diluted Brushos
Paint the petals with yellow first and then the green once that has dried.
The stamens were tipped with brown once the green was dry
I twirled each stamen around my pokey tool, poked the end through the handy hole in the centre of the lily and glued it at the back with Collall Glue Gel.
They lose some of their dimension when glued down flat on the card but I think they still look fab :o)
So here's my finished piece, all tied up with bright orange organza ribbon
I would like to enter this in the following challenges:-
First I'll show you how I did the colourful background. I started by painting some Sheena Stamping Card with white Tinting Base
then I used a wet wipe to apply 3 different colours of acrylic paint
before cutting the card into four equal panels.
I used Leonie's Typography dies to make stencils from white card
and stippled white titanium paint through the apertures with a stencil brush.
with a different letter on each of the panels
I used the yellow, orange and green paints to stencil more letters through and then stamped around the edges with Leonie's Funky Tree stamp
I applied lots of Pebeo Gilding Paste from the bottle around the edges of each panel using a paintbrush, then left it to dry for an hour.
before applying Gold Metal Leaf (shiny side up)
I thought I would have to press quite hard to get the foil to stick but it comes off really easily
To mount my painted panels I cut a 10.5 x 28cm strip of black card and scored/folded at 7, 14 and 21cm, then glued each panel on with Collall Tacky Glue
For the front of my card I used two of the Typography mini embossing folders to emboss another painted panel of card. Remember to leave the edge of the folder poking out over the edge of your platform so you don't get a line across the card.
I used a sanding block over the raised areas to reveal the white card underneath
For the final decoration I made some lilies from white paper using Sara's Shabby Chic Classic Lily dies, coloured with diluted Brushos
Paint the petals with yellow first and then the green once that has dried.
The stamens were tipped with brown once the green was dry
I twirled each stamen around my pokey tool, poked the end through the handy hole in the centre of the lily and glued it at the back with Collall Glue Gel.
They lose some of their dimension when glued down flat on the card but I think they still look fab :o)
So here's my finished piece, all tied up with bright orange organza ribbon
I would like to enter this in the following challenges:-
Creative Artiste Challenge #25 Anything Mixed Media Goes
Deep Ocean Challenge #153 Spring
Artistic Stampers Backgrounds
Noor Design UK Flowers
We Love 2 Create #8 Anything Creative/Mixed Media Goes
Creatalicious Challenges #113 Anything Goes with optional Birthday
Stemplegarten #60 colourful spring
Now, did someone mention candy? :o)
If you've been following me for a while you'll know that I like my round numbers and I had giveaways for my 100th and 200th blog posts. It's going to be a few weeks yet until my 300th post (this is number 284) but I hope to reach another milestone before then.
I am immensely grateful to have 97 fabulous followers on Google, but I would love to get to 100 so when I reach the magic number I will have a little giveaway.
Deep Ocean Challenge #153 Spring
Artistic Stampers Backgrounds
Noor Design UK Flowers
We Love 2 Create #8 Anything Creative/Mixed Media Goes
Creatalicious Challenges #113 Anything Goes with optional Birthday
Stemplegarten #60 colourful spring
Now, did someone mention candy? :o)
If you've been following me for a while you'll know that I like my round numbers and I had giveaways for my 100th and 200th blog posts. It's going to be a few weeks yet until my 300th post (this is number 284) but I hope to reach another milestone before then.
I am immensely grateful to have 97 fabulous followers on Google, but I would love to get to 100 so when I reach the magic number I will have a little giveaway.
Thanks for stopping by, I hope to see you again soon.
Katrina x
Wednesday, 23 November 2016
Happy Movember for Leonie
Wow, that week went quickly. Hot on the heels of my trip to Cornwall to see my family, my sister-in-law arrived for a few days and I had my first day back at work ☺
This week is a bit quieter though, so I'll be getting a couple more blog posts in.
While it's still November, I thought I'd share my Movember card that I made for Leonie's sale shows last Wednesday/Thursday
To do the greeting I stamped some of the Message Ribbons onto white card with Black Memento Ink
and cut them up to get the words/letters I wanted
Next I covered a 6x6" card blank with papers from the 'He Said, She Said' paper pad by Teresa Collins
It's finished off with black enamel dots (Ranger Enamel Accents)
I would like to enter this in the following challenges:-
Crafty Catz #346: Anything Goes (Optional twist --use red)
Creative Moments #106 Anything Goes
Creatalicious Challenges #103 - Anything Goes with optional use a sentiment
613 Avenue Create #191 Anything Goes
Crafting With An Attitude #21 Anything Goes Always
Happy Little Stampers Anything Goes with Dies Challenge November
Thanks for stopping by,
Crafty Catz #346: Anything Goes (Optional twist --use red)
Creative Moments #106 Anything Goes
Creatalicious Challenges #103 - Anything Goes with optional use a sentiment
613 Avenue Create #191 Anything Goes
Crafting With An Attitude #21 Anything Goes Always
Happy Little Stampers Anything Goes with Dies Challenge November
Thanks for stopping by,
Katrina x
Subscribe to:
Posts (Atom)