Friday, 9 May 2014

A Flutter of Butterflies

Morning Peeps.
 
These are my versions of a card shown on Create and Craft by Nikki Hall with the Tatty Twinkles stamps (thank you for the fabulous idea).
I've used Inkylicious, Docrafts Urban and Crafters Companion butterflies
 
 
For my masks I stamped all the butterflies first onto copy paper and cut them out, then put zig 2 way glue on the back and let it dry (it becomes repositionable once clear). 
 
I then stamped the butterflies straight onto an 8x8 card with Memento Rich Cocoa, masking them off and overstamping as I went. So far, so good, but I decided to stamp the greeting, swirls and flowers onto the card before I spent an hour colouring them in with Promarkers (just in case I mucked up the stamping).
 
It turned out so well I had another go with different colours:

 
Not bad, but the colours in the first one are more me.
 
I took them both into work so they could pick one for Fi's 60th Birthday card and they decided on the second one. So it doesn't matter that I stamped my logo upside down on the back of the first card :D
 
That's all for today, so it just remains for me to say
 
Happy Birthday Fi x
 

Thursday, 8 May 2014

Catching Up


Crumbs, it has been a long time, hasn’t it? I must try to get back in the habit !
 
I’d just like to share photos of some of my favourite pieces with you from our Cardmaking Club sessions last year. Sorry for the explanations being a bit sparse, if you've any questions please ask x 
 

Imagination Decoupage Stamps

Coloured with promarkers and decoupaged, mounted onto red pearlescent card that has been embossed
 

No decoupage here, I heat embossed the outline with gold embossing powder then coloured in with pearly paints
 

Coloured with promarkers again and decoupaged,
layered onto tracing paper to lighten up the background a little


 Alcohol Inks on Acetate 

 As seen on TV!
I forgot to photograph this one before I sent it in to 'In the Classroom with Barbara Gray',
 so I snapped it during the show.
(all stamps by Clarity Stamps)
 
(Poppy Meadow stamp by Inkylicious)
 

Colouring tags and paper flowers with distress inks

 
 Love the way the ink pooled in between the grasses
- they were embossed with clear powder first
 

4 Panel Cards

Fabulous inspiration from club member Kristi
 
My effort - no comparison, but I'm happy with it


Tunnel cards

 (most stamps are Crafty Impressions)
 
(Ted is a Lili of the Valley stamp)


More to follow from this year's sessions ...

Saturday, 24 March 2012

Ultra Thick Embossing

Had great fun making examples for club this week. I got all my nice ink pads out and had a good play.
I got my inspiration for the first one from a Joanna Sheen/Diary of an Edwardian Lady backing paper.


 I coloured some mount board with my Versa Color 'grape' ink pad, then sprinkled with clear UTEE . I inked up my Inkadinkdo grass seeds stamp with pearlescent champagne ink and pressed it into the second coat of the melted UTEE.
I wanted an 'organic' looking ribbon and found some wide gold fusible fibres type. I taped this to the card underneath the topper so that the adhesive doesn't show.
I didn't have a base card to match so just went around the edges of a white card with my grape ink pad.
The card is finished off with some purple pearl adhesive stones.


The second card is using another Diary of an Edwardian Lady backing paper.  The mountboard was already a petrol blue colour which I thought would match well with the blue in the paper. I inked up one of Sheena's autumn leaves stamps with gold ink to press into the top layer of UTEE. 
I couldn't find the right shade of turquoise ribbon to go with it so I tied one blue and one yellow organza ribbon on the card together.
I used different sizes of yellow blue and green adhesive gems to decorate the bottom.


For the next one I blended pink, yellow and green inks together on some mount board and then overstamped the text and butterfly in black. I let this dry before dabbing all over with Versamark and pouring the UTEE on. I sprinkled some glitter and stars into the second coat of melted UTEE.
The background is made up of three different pieces of coloured card. The pink card has been stamped with pink text and the swirls were added afterwards with Versamark ink and holographic embossing powder. The green card is a from the packaging of a My Minds Eye/Wild Asparagus kit which I have sanded around the edges. The last piece is just white card coloured with scattered straw distress ink. I stamped over it with the same butterfly stamp but using second generation ink (i.e. I blotted the inked-up stamp onto paper before I stamped it onto the card).


The last card is using (guess what) another Diary of an Edwardian Lady backing paper. I decided to decorate some butterfly chipboards I found in my stash (from Papermania). I inked the first one with Versamagic 'Mango Madness' chalk ink (to pick out the tiny bits of orange in my backing paper), and then I covered it with clear UTEE. For the second butterfly I inked it in white and sprinkled on white emobssing powder. I then covered it in Versamark and inked the edges with mango madness before sprinkling with UTEE and melting again.
 I don't know whether it was the inks or the different embossing powders reacting, but the effect came out quite mottled, which I have to say that I rather liked.


The orange backing paper is from the My Minds Eye 'Bloom and Grow' collection and the white polka dot ribbon was from Joanna Sheens website.

The tag was coloured with Frayed Burlap distress ink (and a very useful La Blanche flourish stamp).  It's finished off with some garden twine!


Tuesday, 24 January 2012

Shrink Plastic cards

I made these three cards for the cardmaking club session on 12th Jan. The theme was shrink plastic, something I love playing with!


The first card I made was with a gorgeous Dimension 4th bear that I did on clear shrink plastic. You can see the image clearly on either side, so I've put him reverse side up to make him face the other way to the full sized bear. I stamped the large bear onto plain white card with black memento, coloured him in with brown promarkers and cut him out. I've slotted him behind the stripy border so he looks like he's sitting on something and not floating in thin air. The papers are Nitwit freebies I got in an old issue of Creative Cardmaking magazine.


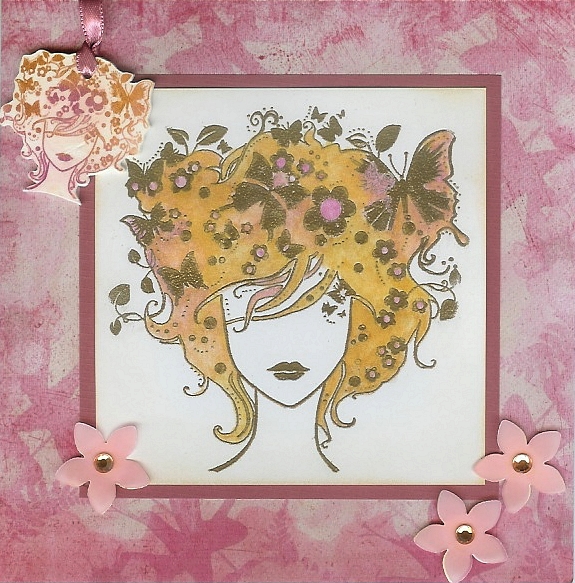
My second card is using this beautiful girls head stamp. I stamped her onto white shrink plastic and coloured her with gold and pink mica powders before cutting her out, punching a hole (I usually forget this bit!) and shrinking. For the main image I've embossed with detail gold embossing powder, then painted her hair with mica and a damp paintbrush. I punched my flowers out of pink vellum for a delicate look and used gold sticky gems for the centres (I used a tiny dot of glue in the centre of each flower to attach them to the card, this was then hidden by the gems). The background paper is from the 'Mothers Day' digikit for CraftArtist.


My last card is using one of my favourite stamps - a maple leaf from the Poetic Prints collection by Hero Arts. I stamped it onto frosted shrink plastic with a chalk ink pad and cut around the image before shrinking. The ink didn't dry even after shrinking, so I've attached it wet side down with some pinflair glue gel. I used the same stamp and five different coloured inks to make a border two thirds of the way across the front of a 6x6 cream card blank (using a mask made from the maple leaf image stamped onto a sticky note and cut out). I then cut around the edges of the leaves, revealing the inside of the card, which I covered with a paper from the Cocoa Latte digikit from CraftArtist/Daisy Trail

Saturday, 21 January 2012

My winning entry in Penny Black category for Cardmaker of the Year 2011


I used two of the stamps from Penny Black's 'Micey Day' clear stamp set to make this card.

After stamping and colouring in the toaster image, I cut a slit along the line where the front piece of toast meets the toaster. I then mounted it onto some brown card using narrow double-sided sticky tape around the outside edges only, so there was space to fit something into the slit I had made.

I cleaned the stamp and re-inked just the top of one piece of toast with a brown Whispers pen. I stamped four of these onto white card and then made them into complete pieces of toast with the fine end of the same pen (I made the fourth one extra long as the bottom half needed to fit into the slot I made in the toaster). I coloured the toast in with promarkers and then stamped 'with love' onto the long piece with versamark ink and chalks. I punched a small hole in the top right hand corner and tied some raffia on. I then fitted it into the slot in my toaster with just the top showing, so that it could be pulled out to reveal the message.

I stamped the teacup image onto white shrink plastic and coloured it in with whispers pens.

I made each flower by punching 2 daisies out of pearlescent white paper and layering them up with a pink gem.